It's been a long time since I've posted, because of reasons I won't get into, I have been feeling very un-inspired. Until now. And all apologies for the lack of photo - my camera got destroyed on a recent cliff-jumping adventure. Ahem.
There's nothing better than sweet corn-on-the-cob, fresh from the farm! I've created my own recipe on what to do with a bumper crop of fresh (and uncooked) ears of corn. This would work with frozen corn kernels, I assume, but it would certainly be less delicious.
These little beauties are very sweet, just the way I like my cakes. They are relatively one-dimensional in flavour, and would be best served with an accompaniment. These would taste great with some of your favourite spices added to taste, or topped with whipped cream and seasonal fruit or berries shortcake-style.
1 3/4 c. flour
2 tsp. baking powder
1 tsp. salt
1 c. sugar (this can be reduced according to taste)
1/3 c. butter, cold
1/2 c. buttermilk
2 eggs
1 1/2 c. fresh corn kernels, cut off the cob
Preheat the oven to 350 F. Prepare a muffin tin with paper liners.
In your food processor, combine the flour, baking powder, salt, and sugar and pulse to combine. Add the cold butter in pieces and pulse until the mixture resembles a coarse meal. Add the corn kernels and pulse until combined. Whisk together the buttermilk and eggs. Add the mixture from the food processor into the milk mixture and stir to combine. Dole out about 1/4 cup of batter per cupcake.
Bake for about 20 minutes, or until browned and a toothpick poked into the centre of a cupcake comes out clean.
Enjoy! Yields 12 - 15 cupcakes.

Showing posts with label easy. Show all posts
Showing posts with label easy. Show all posts
Sep 10, 2011

Mar 29, 2010
Pink Pickles!

3 bunches of radishes, washed and trimmed
1 c. of white vinegar
1 c. of warm water
1/2 c. of sugar
1 tsp. salt
Cut the radishes however you like - I quartered mine. Then place the cut radishes into two large mason jars. Combine the vinegar, water, sugar, and salt until everything is dissolved. Pour the mixture into each jar until the radished are covered. Screw the lids on the jars, and store in the refrigerator for several days until the red skins have bled out and turned everything pink! They should keep for about two weeks in the fridge.
You can also use an Asian radish, also known as a Daikon. They are much larger. The Daikon is what is actually used for the KBBQ side dish.
Mar 3, 2010
Peanut Butter Chocolate Chip Cookies
Isobel requested this one! This is a dead easy recipe. I can't really take credit for it, and I'm not sure who can, as it is on the label of just about every peanut butter jar you buy. It's almost stupefying in its simplicity - there's no flour, no soda, no added oil ... just pure goodness. If happiness took on cookie form, this would be it.
1 c. peanut butter (crunchy or smooth, your choice)
1 c. granulated sugar
1 egg
Optional: 1/2 package chocolate chips
Preheat your oven to 350 F. Arrange a sheet of parchment paper on a cookie pan. Stir first three ingredients together until they are well-combined. Fold in chocolate chips. Drop tablespoonfuls of batter onto the parchment paper, and flatten with the tines of a fork. Bake for 6 - 8 minutes, and don't overbake! These cookies are by far at their best when chewy.
1 c. peanut butter (crunchy or smooth, your choice)
1 c. granulated sugar
1 egg
Optional: 1/2 package chocolate chips
Preheat your oven to 350 F. Arrange a sheet of parchment paper on a cookie pan. Stir first three ingredients together until they are well-combined. Fold in chocolate chips. Drop tablespoonfuls of batter onto the parchment paper, and flatten with the tines of a fork. Bake for 6 - 8 minutes, and don't overbake! These cookies are by far at their best when chewy.
Jan 26, 2010
Vanaema's Sauerkraut
My grandmother (vanaema in Estonian) told me, verbally, how she makes her sauerkraut. I'm not sure if I remembered it in its entirety, and I just kind of made what I thought she said. It turned out great and I make it this way all the time. It's a hard one to screw up, though. *Edit: I talked to her the other day and she told me that I had it all wrong! Oops. I'm still not going to change it because this is how I make it!*
This sauerkraut is rather sweet. It's certainly not the kind of 'kraut you get from the jar! Try different ways of sweetening this recipe - brown sugar, white sugar, maple syrup, or apples.
1 head of green cabbage, shredded or julienned
1 jar of naturally fermented sauerkraut (not wine-fermented!)
1 large vidalia or sweet onion, chopped
2 - 3 apples, peeled, cored, and chopped
1/4 c. vegetable oil
1/4 c. apple cider vinegar
1/2 c. brown sugar
2 tsp. salt
1 tsp. fresh ground pepper
Optional: 1/2 lb. bacon, ham, or pork, chopped
Mix all ingredients together in a large pot with a lid. Place in the oven at about 300 F for 4 - 5 hours, stirring occasionally. The sauerkraut will turn golden brown, smell a little sour and a little sweet, and you'll get awesome chewy bits where the mixture has been baking up against the side of the pot. It will have caramelised nicely because of the sugar and apples, and the cabbage will be oh-so-tender.
You can also make this in your slow cooker, on HIGH for 6 hours or LOW for 10 hours. Enjoy!
This sauerkraut is rather sweet. It's certainly not the kind of 'kraut you get from the jar! Try different ways of sweetening this recipe - brown sugar, white sugar, maple syrup, or apples.
1 head of green cabbage, shredded or julienned
1 jar of naturally fermented sauerkraut (not wine-fermented!)
1 large vidalia or sweet onion, chopped
2 - 3 apples, peeled, cored, and chopped
1/4 c. vegetable oil
1/4 c. apple cider vinegar
1/2 c. brown sugar
2 tsp. salt
1 tsp. fresh ground pepper
Optional: 1/2 lb. bacon, ham, or pork, chopped
Mix all ingredients together in a large pot with a lid. Place in the oven at about 300 F for 4 - 5 hours, stirring occasionally. The sauerkraut will turn golden brown, smell a little sour and a little sweet, and you'll get awesome chewy bits where the mixture has been baking up against the side of the pot. It will have caramelised nicely because of the sugar and apples, and the cabbage will be oh-so-tender.
You can also make this in your slow cooker, on HIGH for 6 hours or LOW for 10 hours. Enjoy!
Jan 23, 2010
Perfect Pancakes
This is my own recipe. It is better than Bisquick, I promise! Plus it's very easy, never chewy, always fluffy - the perfect pancake! The purpose of the spelt or buckwheat flour is to prevent the pancakes from going chewy if you happen to stir the batter too much. Spelt and buckwheat have very little gluten, and gluten is what is responsible for the chewiness of bread. You can use any gluten-free flour in place of the spelt or buckwheat in this recipe.
Preheat a non-stick griddle to medium heat. Make sure your griddle is completely heated before you pour your pancakes.
Combine in a large bowl:
1 c. unbleached all-purpose flour
1 1/2 c. spelt or buckwheat flour
1/4 c. granulated sugar
1 tsp. salt
4 tsp. baking powder
Combine in a large measuring glass:
2 eggs, whisked
2 c. milk + 2 tsp. vinegar (or just use buttermilk)
1 tsp. vanilla extract
3 Tbsp. oil
Stir the wet ingredients into the dry, and mix with a fork until just combined (but not if there are still large lumps of dry flour throughout the batter - stir the batter till the bigger lumps have broken up). Spray the griddle with oil, and pour 1/4 cup portions of pancake batter onto the hot griddle. Fry them until you see lots of bubbles surfacing on top and are a deep golden brown, and then flip them over. Cook the other side until it is also a deep golden brown. Serve the pancakes immediately with butter, syrup, jam, or whatever tickles your fancy. They can also be kept warm on a stoneware plate in the oven set on the coolest temperature.
I like to make large batches of pancakes. This recipe yields about 20 - 25 pancakes. Halve the recipe if you desire. I like to eat the morning's cold pancakes for lunch with cheese and lunchmeat on them, popped in the microwave for a few seconds. Not sure why. I just like them that way.
Preheat a non-stick griddle to medium heat. Make sure your griddle is completely heated before you pour your pancakes.
Combine in a large bowl:
1 c. unbleached all-purpose flour
1 1/2 c. spelt or buckwheat flour
1/4 c. granulated sugar
1 tsp. salt
4 tsp. baking powder
Combine in a large measuring glass:
2 eggs, whisked
2 c. milk + 2 tsp. vinegar (or just use buttermilk)
1 tsp. vanilla extract
3 Tbsp. oil
Stir the wet ingredients into the dry, and mix with a fork until just combined (but not if there are still large lumps of dry flour throughout the batter - stir the batter till the bigger lumps have broken up). Spray the griddle with oil, and pour 1/4 cup portions of pancake batter onto the hot griddle. Fry them until you see lots of bubbles surfacing on top and are a deep golden brown, and then flip them over. Cook the other side until it is also a deep golden brown. Serve the pancakes immediately with butter, syrup, jam, or whatever tickles your fancy. They can also be kept warm on a stoneware plate in the oven set on the coolest temperature.
I like to make large batches of pancakes. This recipe yields about 20 - 25 pancakes. Halve the recipe if you desire. I like to eat the morning's cold pancakes for lunch with cheese and lunchmeat on them, popped in the microwave for a few seconds. Not sure why. I just like them that way.
Jan 20, 2010
Tuna Melt Pasta
 I'm not a tuna fan. At all. But J sure is, and he loves my tuna melts! So, I adapted my typical tuna melt on toast recipe into a quick and easy pasta dish.
1/2 bag of your favourite pasta
2 c. fresh or frozen raw vegetables (broccoli, cauliflower, carrots, asparagus, peppers ... the sky is the limit)
3 Tbsp. butter or cooking oil
2 - 3 cloves of fresh grated or minced garlic
1/2 lb. peeled shrimp, tails off
1 tsp. each garlic powder, onion powder, mustard powder, sea salt, fresh black pepper
3 Tbsp. flour
1 c. milk
1/4 c. white wine
1/2 c. beef broth
Dash of worcestershire sauce
1 - 2 tins flaked tuna, drained (go by how tuna-y you want your sauce)
1/4 c. parmesan cheese
1 c. grated sharp cheddar cheese
You will need a large pot for your pasta, and a large non-stick skillet for your sauce. Boil the pasta water with some salt and olive oil. The salt gives flavour, and the olive oil prevents the pastas from sticking together when you pour it outinto your colander. When the water starts to boil, is also when you should begin making your sauce. It is very quick.
Throw your pasta and your vegetables into the boiling pot. When pasta is al dente, drain.
While pasta is boiling, heat up/melt your butter or oil in the skillet over medium heat. Saute garlic for a few seconds, then throw in the shrimp and cook them (if they are already cooked, and not frozen, add them with the tuna later on). Coat the sauteing shrimp in the powders, salt and pepper, then whisk in the flour until it is completely incorporated into the fat.
Whisk in milk, wine, worcestershire, and broth. Bring to a simmer, stirring often, and whisk until it is thick. Taste it at this point and make sure your sauce is tasty enough - add more spices if you like. Stir in your can(s) of tuna (and shrimp if they are cooked and room-temperature), and simmer until it is heated through. Whisk in the cheeses (feel free to use different types of cheese than those listed) until they are melted, and sauce is nice and gooey!
Serve this creamy sauce over the pasta and vegetables, nice and hot. There you have it: quick, easy, and cheap comfort food!
Dec 15, 2009
Easy Peanut Butter Balls
This recipe is from my friend Teresa: "Here's one for your blog, love it and it's so easy ... can't remember where we got the recipe from, but my mom and I have been making them for years!"
1 can sweetened condensed milk
2/3 c. peanut butter
2 c. graham wafer crumbs
1 c. chocolate chips
1 c. flaked coconut
Mix condensed milk and peanut butter. Stir in chocolate chips and graham wafer crumbs and mix well. Shape into one inch balls, roll in coconut flakes, and store in the fridge. Remove from fridge 15 minutes before serving.
1 can sweetened condensed milk
2/3 c. peanut butter
2 c. graham wafer crumbs
1 c. chocolate chips
1 c. flaked coconut
Mix condensed milk and peanut butter. Stir in chocolate chips and graham wafer crumbs and mix well. Shape into one inch balls, roll in coconut flakes, and store in the fridge. Remove from fridge 15 minutes before serving.
Dec 9, 2009
Pesto
Pesto is so useful. You can mix it with a bit of pasta-water to use as a pasta sauce with mushrooms or chicken, or you can nibble a slice of baguette or toast spread with goat's cheese topped with this great green stuff. And it keeps so long in the fridge! Best used with basil picked minutes earlier from your garden, you can also use the packaged-fresh variety. Consider yourself warned - this stuff is addictive.
3 or 4 handfuls of fresh basil leaves (you can include stems, but it gets a little stringy)
3 - 4 Tbsp. olive oil
2 cloves fresh garlic
Sea salt to taste
Splash of lemon juice
1/4 c. parmesan cheese
1/2 c. pine nuts - expensive but don't try to substitute
Add all ingredients to your food processor and blend until everything is incorporated into a thick paste. Alternatively, put everything in a large bowl and puree with a hand blender.
Don't be afraid to add a little more of this and a bit more of that. More oil means a more spreadable mixture. More garlic means no one will want to kiss you for the rest of the day. Taste as you go, and you will have the perfect pesto!
Store in a mason jar with a tight-fitting lid, in the fridge. It will keep for I daresay a month - if it's not already eaten by then!
3 or 4 handfuls of fresh basil leaves (you can include stems, but it gets a little stringy)
3 - 4 Tbsp. olive oil
2 cloves fresh garlic
Sea salt to taste
Splash of lemon juice
1/4 c. parmesan cheese
1/2 c. pine nuts - expensive but don't try to substitute
Add all ingredients to your food processor and blend until everything is incorporated into a thick paste. Alternatively, put everything in a large bowl and puree with a hand blender.
Don't be afraid to add a little more of this and a bit more of that. More oil means a more spreadable mixture. More garlic means no one will want to kiss you for the rest of the day. Taste as you go, and you will have the perfect pesto!
Store in a mason jar with a tight-fitting lid, in the fridge. It will keep for I daresay a month - if it's not already eaten by then!
Eesti Pannkoogid - Estonian Pancakes
This is my great aunt's recipe! These are delicious, they are like crepes more than pancakes. Enjoy with your favourite jam, particularly lingonberry or blackcurrant, with sour cream, or filled with ground beef and onions!
1/2 c. flour
1 1/4 c. milk
1 Tbsp. sugar
1/4 tsp. salt
3 eggs
Whisk ingredients together until very smooth. Let the batter sit for 15 minutes or longer before you begin to cook these.
Heat up a round fry pan, non-stick is easiest, on medium heat. Melt a chunk of butter and spread to all edges of the pan. Ladle in a spoonful of pannkook batter and tilt your pan until the batter has reached the edges. Since these are thicker than the traditional French crepe, the amount of batter you add to the pan is greater. Let the batter cook until the edges of the pannkook start to curl up, and the underneath is white and brown. Then, tactfully if possible, flip the pannkook over and cook for just a minute or two, until the unerneath is white and brown as well.
Repeat this procedure until all of your batter is used up. If you're coordinated enough, you can have two or three pans going at once to speed things up. My aunt serves me each one as it comes fresh off of the pan. Don't be fooled by how thin they are - they will fill you right up! They keep very well in the fridge, stacked, and reheat in the microwave beautifully.
1/2 c. flour
1 1/4 c. milk
1 Tbsp. sugar
1/4 tsp. salt
3 eggs
Whisk ingredients together until very smooth. Let the batter sit for 15 minutes or longer before you begin to cook these.
Heat up a round fry pan, non-stick is easiest, on medium heat. Melt a chunk of butter and spread to all edges of the pan. Ladle in a spoonful of pannkook batter and tilt your pan until the batter has reached the edges. Since these are thicker than the traditional French crepe, the amount of batter you add to the pan is greater. Let the batter cook until the edges of the pannkook start to curl up, and the underneath is white and brown. Then, tactfully if possible, flip the pannkook over and cook for just a minute or two, until the unerneath is white and brown as well.
Repeat this procedure until all of your batter is used up. If you're coordinated enough, you can have two or three pans going at once to speed things up. My aunt serves me each one as it comes fresh off of the pan. Don't be fooled by how thin they are - they will fill you right up! They keep very well in the fridge, stacked, and reheat in the microwave beautifully.
Chocolate Cake
This is my guarantee: If you follow this recipe exactly, it will yield the richest, most moist and chocolatey cake you have ever tried. Adapted from a recipe at AllRecipes.com, but the changes I made make all the difference.
Save 1 c. of your morning strong-brewed coffee for this recipe, or brew some in advance and cool it off.
1 c. milk
1 Tbsp. vinegar
Combine vinegar with milk to curdle.
1 3/4 c. flour
2 c. white sugar
1 c. sifted cocoa powder
1 tsp. baking powder
2 tsp. baking soda
1/2 tsp. salt
2 eggs
1/2 c. vegetable oil
1 c. cold strong brewed coffee
1 tsp. vanilla
Preheat oven to 350 F. Grease and flour 2 x 8-inch round cake pans. Alternatively, grease and line bottoms of pans with parchment. Sift dry ingredients together in one bowl. Whisk eggs and oil together in a large bowl, and whisk in vanilla and coffee. Stir in soured milk. Gradually beat in dry ingredients, until just incorporated. Bake for 30 minutes, or until a toothpick inserted in the centre of the cake comes out clean.
This will easily make 24 cupcakes as well - bake for about 12 - 15 minutes.
Pump this recipe up to a Black Forest Cake:
In advance, soak halved and pitted, fresh, sweet black cherries (appx. 30 or 40 berries) in some cherry brandy - overnight is best. When cake is cooled, whip up a carton of whipping cream with sugar and vanilla added (to taste). Drain cherries and spread them generously between your two cake layers. Frost the cake with whipped cream, using a spatula or a piping bag, and decorate with more soaked and fresh cherries.
For those of you who are lactose-intolerant, or who would like to reduce the fat, use Cool Whip or Cool Whip Light instead of whipped cream.
Save 1 c. of your morning strong-brewed coffee for this recipe, or brew some in advance and cool it off.
1 c. milk
1 Tbsp. vinegar
Combine vinegar with milk to curdle.
1 3/4 c. flour
2 c. white sugar
1 c. sifted cocoa powder
1 tsp. baking powder
2 tsp. baking soda
1/2 tsp. salt
2 eggs
1/2 c. vegetable oil
1 c. cold strong brewed coffee
1 tsp. vanilla
Preheat oven to 350 F. Grease and flour 2 x 8-inch round cake pans. Alternatively, grease and line bottoms of pans with parchment. Sift dry ingredients together in one bowl. Whisk eggs and oil together in a large bowl, and whisk in vanilla and coffee. Stir in soured milk. Gradually beat in dry ingredients, until just incorporated. Bake for 30 minutes, or until a toothpick inserted in the centre of the cake comes out clean.
This will easily make 24 cupcakes as well - bake for about 12 - 15 minutes.
Pump this recipe up to a Black Forest Cake:
In advance, soak halved and pitted, fresh, sweet black cherries (appx. 30 or 40 berries) in some cherry brandy - overnight is best. When cake is cooled, whip up a carton of whipping cream with sugar and vanilla added (to taste). Drain cherries and spread them generously between your two cake layers. Frost the cake with whipped cream, using a spatula or a piping bag, and decorate with more soaked and fresh cherries.
For those of you who are lactose-intolerant, or who would like to reduce the fat, use Cool Whip or Cool Whip Light instead of whipped cream.
Easy Biscuits
I love biscuits, particularly fresh from the oven at breakfast. This is a simple recipe, and can be used to accompany any meal, including chili, sausage gravy, or strawberry jam or compote.
2 c. flour
4 tsp. baking powder
1 Tbsp. sugar
3/4 tsp. salt
1/4 c. cold butter (or margarine)
1 c. milk
Preheat oven to 450 F. Combine all of the dry ingredients, and cut the butter into the dry. Another way to do this, is to freeze the butter and grate it into the dry with a cheese grater. Do not overwork this step. Then, stir in the milk until everything is just combined. Flour a flat surface, and knead 8 to 10 times only. Roll the dough out to 3/4 inch thickness. Cut with cookie cutters, or into squares with a knife. Place on an ungreased cookie sheet (or plop squares into a muffin tin - this method works great). Bake for 10 - 12 minutes, or until very puffy and just golden on top. Serve hot and fresh!
2 c. flour
4 tsp. baking powder
1 Tbsp. sugar
3/4 tsp. salt
1/4 c. cold butter (or margarine)
1 c. milk
Preheat oven to 450 F. Combine all of the dry ingredients, and cut the butter into the dry. Another way to do this, is to freeze the butter and grate it into the dry with a cheese grater. Do not overwork this step. Then, stir in the milk until everything is just combined. Flour a flat surface, and knead 8 to 10 times only. Roll the dough out to 3/4 inch thickness. Cut with cookie cutters, or into squares with a knife. Place on an ungreased cookie sheet (or plop squares into a muffin tin - this method works great). Bake for 10 - 12 minutes, or until very puffy and just golden on top. Serve hot and fresh!
Easy Vanilla Cake

This isn't a recipe of mine, I believe I got it from allrecipes.com
2 c. sugar
4 eggs
2 1/2 c. flour
1 c. milk
3/4 c. vegetable oil
2 1/4 tsp. baking powder
1 tsp. vanilla (I often add an extra tsp. because I love vanilla)
Preheat oven to 350 F. Line and grease two round cake pans (or 2 x 12 cup muffin tins) with parchment paper. Beat sugar and eggs to gether until thickened, about 1 minute. Add flour, milk, oil, baking powder, and vanilla and mix for about 1 minute. Do not overbeat or underbeat! One minute is long enough to develop the glutens in the flour and incorporate lots of air into the batter.
Pour batter into pans and bake until golden and a toothpick inserted in the centre comes out clean (30 - 40 min for round pans, 12 - 15 min for cupcakes).
My Favourite Lemon Bars
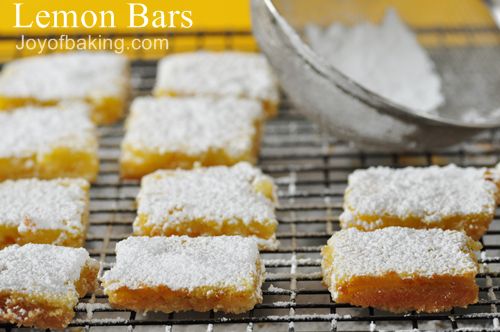
These are tart, delicate, and delicious. Fresh lemons must be used, there is no substitute for the real thing. I used the recipe from JoyofBaking.com.
http://www.joyofbaking.com/LemonBars.html
Trina's Baked Beans

Good old cowboy beans! Tasty, and not the least bit bland. Be careful - when you're done enjoying these beans, things might get a little ... stinky ;) This takes some preparation and should be started about one day in advance of when you would like to serve.
- Soak dried white navy beans in water overnight. Drain and rinse. Put the soaked beans in a pot, cover with water, and boil for ten minutes. Turn off the heat and let the beans soak for an additional hour or two in the hot water. Drain and rinse, and add to slow cooker.
- Add: 1 small can tomato paste, and 3 c. water (Add more water if you like the sauce a little "juicier").
- Add 1/4 c. each of: BBQ sauce, prepared mustard, maple syrup, sugar.
- Add to taste: onion, garlic and bouillon powders, and salt.
- Most importantly (or this can be left out for Veg's) ... add a pound of chopped, uncooked bacon. Mmmm!
Bake on HIGH for at least 6 hours, or LOW 10 - 12 hours.
Serve warm with cornbread, or any other homemade bread. Can easily be reheated.
Subscribe to:
Posts (Atom)